CH - 5 Iteration structures
Explanation of loops in C++ (for, while, do-while)
Loops
Loops are programming constructs designed to execute a block of code repeatedly based on specific conditions or a predefined number of iterations. They help automate repetitive tasks and can simplify code by reducing redundancy. By controlling how many times or under what conditions the code should run, loops enable efficient handling of repetitive processes.
1. While Loop
Its format is: while (expression) statement
and its functionality is simply to repeat statement while the condition set in expression is true. For example, we are going to make a program to countdown using a while-loop:
//custom countdown using while loop

#include<iostream>
using namespace std;

int main() {
	int n ;
	cout << "Enter the starting number > ";
	cin >> n;
	while (n>0) {
		cout<< n<<", ";
		--n;
	}
	cout<<"FIRE!\n";
	return 0;
}
The whole process of the previous program can be interpreted according to the following script (beginning in main):
1. User assigns a value to n
2. The while condition is checked (n>0). At this point there are two posibilities:
* condition is true: statement is executed (to step 3)
* condition is false: ignore statement and continue after it (to step 5)
3. Execute statement:
cout << n << ", ";
n;
(prints the value of n on the screen and decreases n by 1)
4. End of block. Return automatically to step 2
5. Continue the program right after the block: print FIRE! and end program.
2. Do-While Loop
Its format is:
do statement while (condition);
Its functionality is exactly the same as the while loop, except that condition in the do-while loop is evaluated after the execution of statement instead of before, granting at least one execution of statement even if condition is never fulfilled. For example, the following example program echoes any number you enter until you enter 0.
// number echoer

#include <iostream>
using namespace std;

int main () {
	unsigned long n;
	do {
		cout << "Enter number (0 to end): ";
		cin >> n;
		cout << "You entered: " << n << "\n";
	} while (n != 0);
	return 0;
}
The do-while loop is usually used when the condition that has to determine the end of the loop is determined within the loop statement itself, like in the previous case, where the user input within the block is what is used to determine if the loop has to end. In fact if you never enter the value 0 in the previous example you can be prompted for more numbers forever.
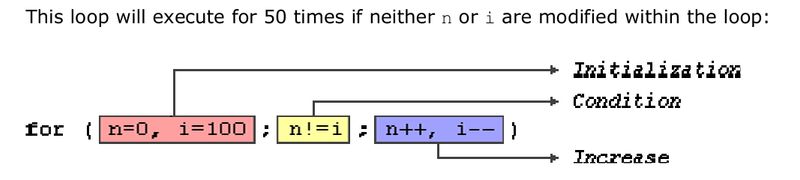
3. For Loop
Its format is: for (initialization; condition; increase) statement;
and its main function is to repeat statement while condition remains true, like the while loop. But in addition, the for loop provides specific locations to contain an initialization statement and an increase statement. So this loop is specially designed to perform a repetitive action with a counter which is initialized and increased on each iteration.
It works in the following way:
1. initialization is executed. Generally it is an initial value setting for a counter variable. This is executed
only once.
2. condition is checked. If it is true the loop continues, otherwise the loop ends and statement is skipped
(not executed).
3. statement is executed. As usual, it can be either a single statement or a block enclosed in braces { }.
4. finally, whatever is specified in the increase field is executed and the loop gets back to step 2.
Here is an example of countdown using a for loop:
// countdown using a for loop
#include <iostream>
using namespace std;
int main () {
	for (int n=10; n>0; n--) {
		cout << n << ", ";
	}
	cout << "FIRE! \n";
	return 0;
}
4. Nested Loops
Nested loops are loops within loops. They are often used when you need to perform a repetitive task within another repetitive task. The following is a example of Nested Loops:
#include <iostream>
using namespace std;

int main(){
    for (int i = 1; i <= 3; i++) { // Outer loop
        for (int j = 1; j <= 3; j++) { // Inner loop
            cout << "i = " << i << ", j = " << j<<endl;
        }
    }
}
5. Switch Cases
The syntax of the switch statement is a bit peculiar. Its objective is to check several possible constant values for an expression. Something similar to what we did at the beginning of this section with the concatenation of several if and else if instructions. Its form is the following:

The following is how the same code would appear using switch case and if else :
switch (x) {
case 1:
	cout << "x is 1";
	break;
case 2:
	cout << "x is 2";
	break;
default:
	cout << "value of x unknown";
}
if (x == 1) {
cout << "x is 1";
}
else if (x == 2) {
cout << "x is 2";
}
else {
cout << "value of x unknown";
}